What if I Dont See the Header in My Facebook Feed Telling Me if I Was Affected by the Breach
The Meta pixel (formerly Facebook pixel) is currently being used by almost 4 million websites around the world.
Now you're probably asking yourself - how could this little pixel become so popular?
Read further to discover what the Meta pixel is, why it is so important for everyone who runs ads on Facebook, and basically, everything you need to know in order to use it to your benefit.
What is Meta (Facebook) Pixel?
Simply put, the Meta (formerly Facebook) pixel is a Javascript code that you add to your website in order to track visitor activity.
The Meta pixel is an analytics tool that helps you measure and increase the effectiveness of your advertising campaigns.
This is done by reporting and analyzing the actions people take on your website. The pixel uses this data to assign people to different target groups you can engage with ads in the future.
In this chapter, I'll explain what the Meta pixel actually is and will share with you a bit of its history. We'll also go a bit into technicalities, but not too deep, so don't worry.
The pixel "fires" when someone takes an action on your website, which is one of these you ordered it to track.
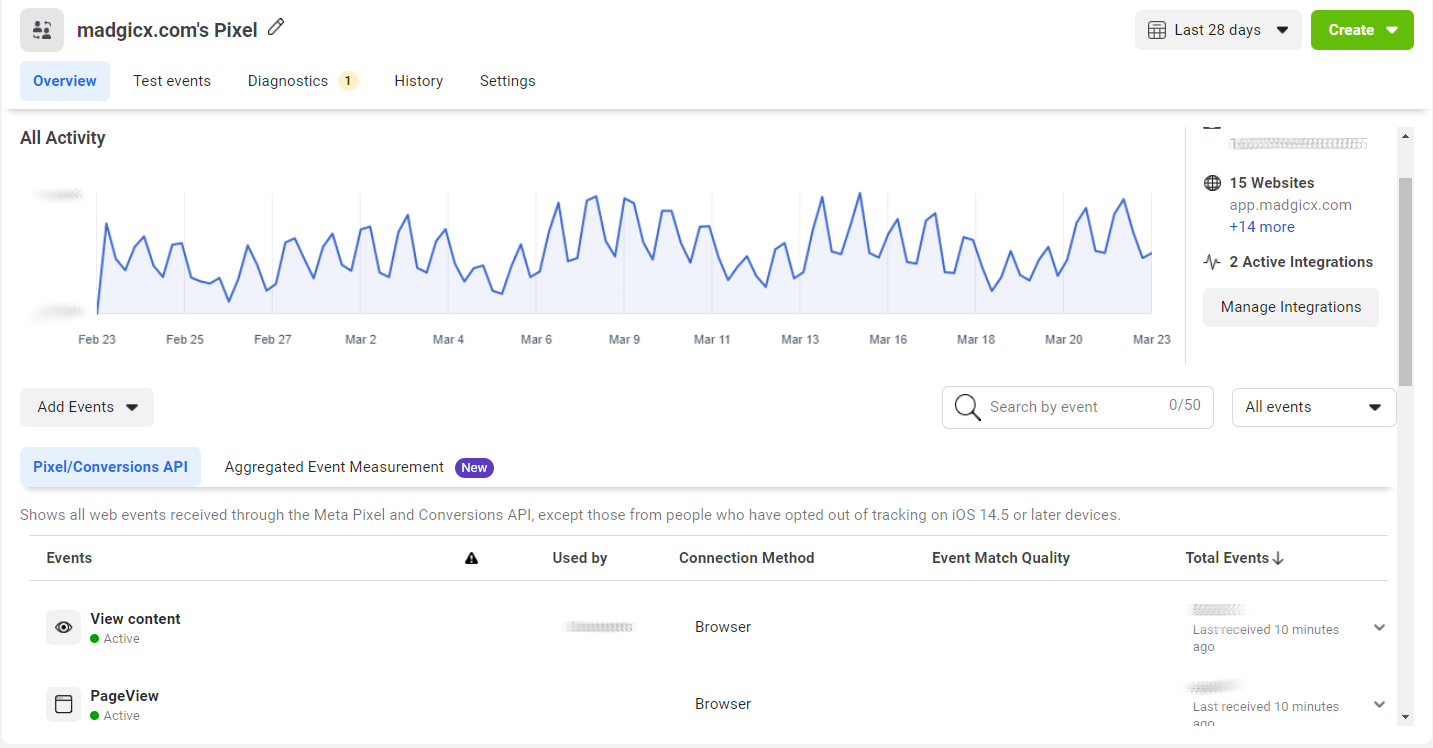
You can view all these actions on your Meta pixel page in the Events Manager. You can also use this data, later on, to advertise to people who visited your website. That's called Retargeting.
Why is the Meta pixel called "pixel"?
The term "pixel" was not coined by Facebook. Tracking pixels and pixel advertising have already been around for quite some time.
Initially, this solution was used for email marketing and was referred to as a "web beacon". Nowadays, it became a standard in many online advertising platforms.
A tracking pixel is a graphic with dimensions of 1x1 pixels that is loaded when a user visits a website or opens an email. It's so small that it's barely noticeable.
These tracking pixels were originally partly or fully designed to be transparent or camouflaged in the background color of the website so that they don't stand out to users.

The tracking pixel URL is the memory location on the server. When the user visits a website, the image with the tag is loaded from this server.
History of the Meta (Facebook) pixel
In 2013, Facebook released two kinds of pixels:
- Website Custom Audience Pixel for retargeting website visitors (AKA Facebook Retargeting Pixel or Facebook Remarketing Pixel)
- Facebook Conversion Pixel for tracking website conversions (e.g. sales)
You could only create one Custom Audience Pixel per Facebook ad account, but many Conversion Pixels - one for each web page you wanted to track conversions on.
In 2015, Facebook made it all more simple and convenient by merging both kinds of pixels into a new and improved Facebook pixel.
In 2017, the Facebook pixel was updated again to include more tracking options, such as button click activity and page metadata. Facebook also discontinued the Conversion Pixel that year.
In January 2022, after turning the Facebook company into Meta, the company changed the pixel name to "Meta pixel."
The Meta pixel code
As I already mentioned, the Meta pixel is simply a snippet of Javascript code that you embed into your website.
It relies on Facebook Cookies, which enable Facebook to match your website visitors to their respective Facebook user accounts.
How does Meta pixel work?
It loads a small library of functions that you can use whenever a website visitor takes a specific action that you want to track. These actions are called "conversions" and they are interpreted by the pixel as "events".
These events can be Page Views, Add-to-Cart, Purchase, Scroll Depth, Time on Page, and more.
The pixel tracks URLs visited, domains visited, and devices your visitors use.
You can view all your tracked conversions in the Facebook Ads Manager and the Facebook Analytics Dashboard.
This will help you to measure the effectiveness of your Facebook ad campaigns, create custom audiences for Retargeting, set up dynamic ad campaigns, and analyze your website's conversion funnels.
Requirements
In order to implement the Meta (Facebook) pixel on your website, you will need:
- Access to your website's codebase.
- Your Pixel's base code or its ID.
- Access to the Facebook Ads Manager.
If your business operates in the EU, you also have to comply with the General Data Protection Regulation (GDPR).
Why you should install the Meta Pixel
Frankly, without the pixel you are shooting in the dark, so why not help Meta help you?
As data becomes more and more important every day, it's crucial to have a strong integration between your website or eCommerce shop and Meta (and any other "walled garden" ad platform).
This data can help you create better Facebook ads and improve your audience targeting.
In this chapter, you will learn about the importance of the Meta pixel in 3 areas: audience creation, measurement, and optimization.
What does Meta pixel do?
Audience Creation
The pixel helps you find new customers and retarget people who have visited a specific page or taken a desired action on your website.
You can use your pixel data to create Retargeting campaigns and dynamic ads. For example, if a customer has abandoned an item in their cart or added it to their wishlist, you can show them a dynamic ad presenting the same item.
You can also create custom audiences of people who have already taken the desired action (such as a subscription) in order to exclude them from your Retargeting campaigns. This will save you money and make sure you're not annoying people with ads asking them to take actions they already did.
Using your pixel data to create lookalike audiences, which include people who have similar characteristics to your customers and website visitors, is also crucial for expanding your customer base.
One of the biggest advantages of creating pixel-based lookalike audiences is that they update automatically, which means they remain relevant for cold traffic campaigns.
Measurement
With the Meta pixel, you can understand the impact of your ads much better by monitoring people's reactions to them.
The pixel shows you how people interact with your website after seeing your ads. It even tracks them across different devices. For example, customers might have seen your ad on mobile and made the purchase on their desktop.
To track ad attribution correctly, make sure you set up the right Meta pixel URL parameters when launching your ads.
You can follow your customers' behavior along every stage of your marketing funnel, from Acquisition through Retargeting to Retention.
Your pixel data includes critical metrics such as Return on Ad Spend (ROAS), Cost per Purchase (CPP), and Cost per Lead (CPL), which you can't track efficiently without it.
This information is crucial for refining your advertising strategy, especially in terms of full-funnel targeting and omnichannel marketing.
Optimization
The pixel allows you to set up automatic bidding to reach people who are more likely to take an action you're interested in, such as making a purchase.
Facebook has a ton of data about its users. Hence, in order for Facebook to find the people who are most likely to convert, all you have to do is ask - set up "conversions" as your campaign objective.
You can optimize for different conversions based on your business model, whether it's purchases or sign-ups.
You can also optimize your campaigns for value, which means that Facebook will show your ads to people who are more likely to make high-value purchases.
In conclusion, installing the Meta pixel will help you increase your conversion rate and your ROAS on Facebook ads.
Pro Tip: Even if you're not running Facebook ads yet, you should install the Meta pixel on your website.
This way, the pixel will start collecting data on your website visitors right away, so you won't have to start from scratch when launching your very first Facebook ads.
How to create and install a Meta pixel
Now that you already understand what the Meta pixel is and how important it is to add it to your website, I'll explain how you can create and install it on your site.
In this chapter, I'll take you step-by-step through the whole process from creation to Meta pixel setup. I'll also use a lot of screenshots to make things clear, so don't you worry about a thing!
Before we start, there are two things you need to have:
- A website for your business
- Permission to update your website's code
If you don't have a website, that's definitely going to be an issue.
If you have no permission to update your website's code, either ask your administrator to grant you permission or let them do the installation for you.
Once we've cleared these out, we can start and create your new Meta pixel.
No worries, it's a pretty simple process.
How to create a Meta pixel?
- Go to your Facebook Events Manager.
- On the left side menu, click "Connect Data Sources".
![]()
- Select "Web" and click "Get Started".
![]()
- Select "Facebook Pixel" and click "Connect".
![]()
- After reading how the pixel works, click "Continue".
- Give your pixel an indicative name. Try something more creative than "My Pixel".
- Enter your website URL to check for easy setup options.
![]()
- Click "Continue."
Add the Meta pixel to your website
Once your new pixel was created, it's time for the Meta pixel setup on your website.
- Go to the Facebook Events Manager.
- Select your pixel.
- Click "Continue Pixel Setup".
At this stage, you have 3 possible ways to continue: manual installation, using a partner integration, or sending the instructions to your website administrator.
Manually add the Meta pixel code to your website
- Select "Install Code Manually".
- Copy the pixel base code.
- Find your website's header or locate the header template in your CMS or web platform.
- Paste the base code at the bottom of the header section, just above the closing head tag.
- Click "Continue".
- At this stage, you can turn on "Automatic Advanced Matching" and verify the customer information you want to send. This is only optional and I'll explain more about it later on.
- Click "Continue".
- Add Events using the Events Setup Tool or by manually adding the relevant code to your website. More about Meta pixel events later.
- Click "Done".
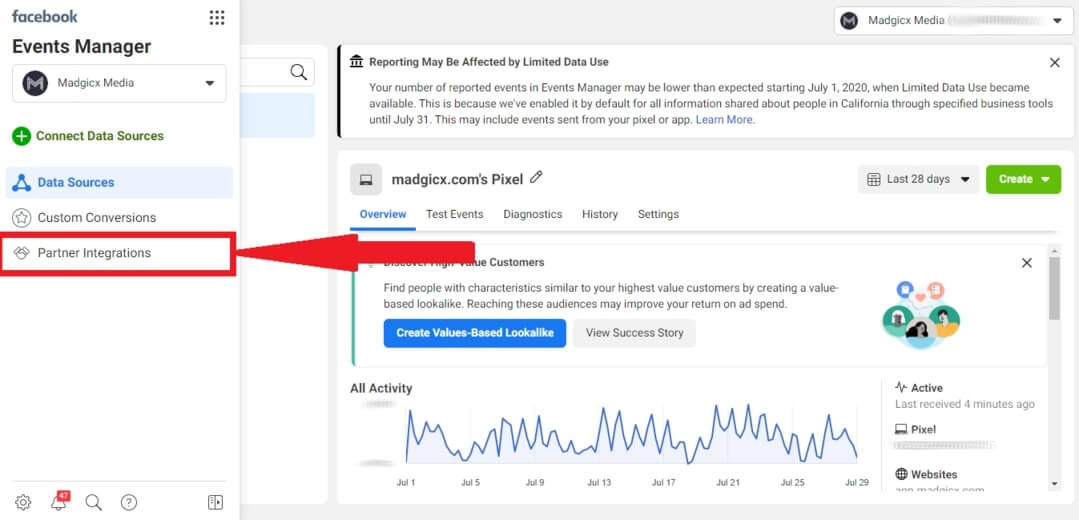
Use a partner integration
- Click "Use a Partner".
- Select the relevant partner from the list.
- Follow the on-screen setup instructions.
Alternatively, you can go to the Partner Integrations page in the Facebook Events Manager, select your partner, and follow the on-screen instructions.
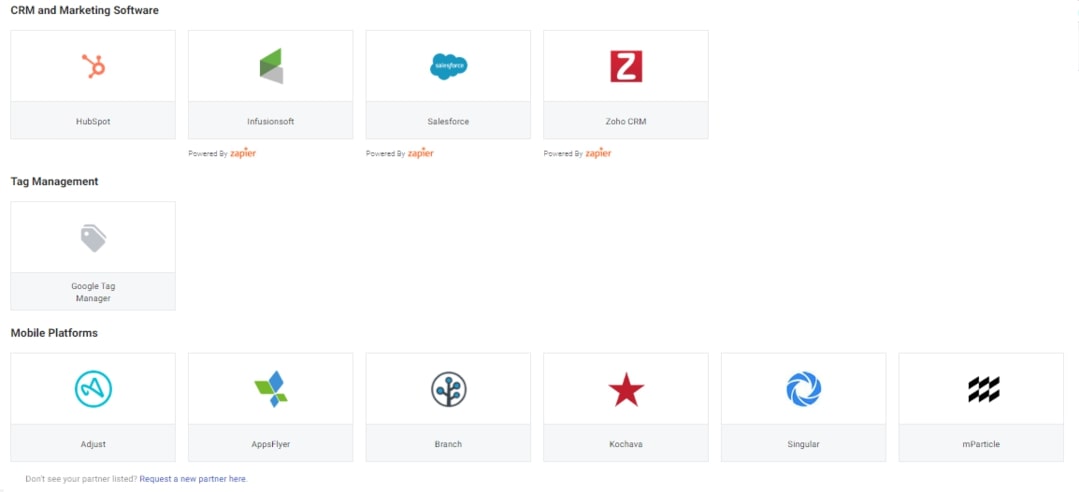
Facebook has integrations for multiple eCommerce platforms, such as:
- Shopify
- Magento
- Woocommerce
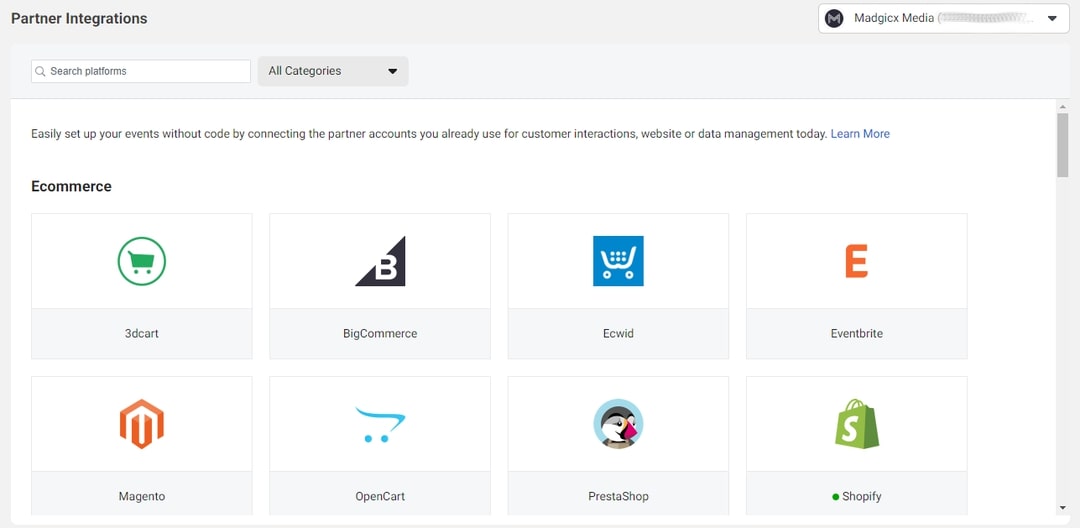
Facebook also has integrations for various website platforms, including:
- WordPress
- Wix
- Squarespace
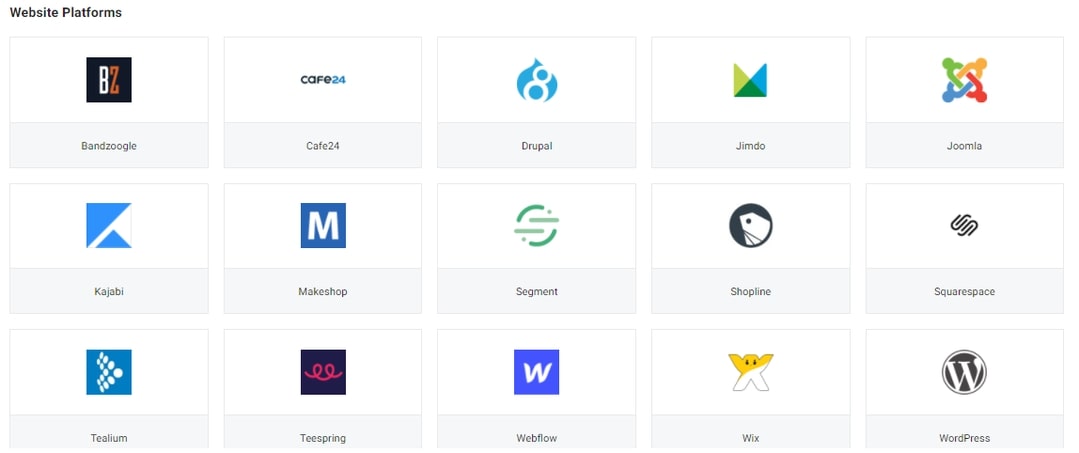
In addition, Facebook has an integration for Google Tag Manager and for many customer data platforms, data connection platforms, CRM and marketing software, and mobile platforms.
Send instructions via email
If someone else, such as your web developer, will be doing the Meta pixel setup on your website for you, you can easily send them the instructions by email.
This is how you do it:
- Click "Email Instructions".
- Enter the recipient's email address.
- Click "Send" at the bottom of the page.
How to find Meta (Facebook) pixel ID?
Now that you have a Meta pixel (Hooray!), what happens if you want to connect it to another platform?
All you need is your Meta pixel ID!
You can find it in the Facebook Events Manager on the left side of the screen under your pixel's name.
![]()
Pro Tip: Did you know that anyone can steal your Meta pixel ID and install it anywhere?
If someone wants to damage your targeting, they could, for example, take your Meta pixel ID and implement it on a website that has nothing to do with your business. One of our competitors once reported that someone installed their pixel on a website for people who search for "clubs, bars, sex" in Tokyo.
That's why routine pixel audits are crucial for your business. Once you audit your pixel, you'll discover such issues right away. And once you discover such an issue, the solution is very simple.
Even if you don't have access to the website on which your pixel was installed, you can add this site to your block list. Simply go to Events Manager, select the "Settings" tab, and scroll down all the way to Traffic Permissions and edit your block list.
![]()
Meta pixel events
The next step, after creating and installing the Meta pixel on your website, is setting up your desired events. These events are the actions you wish to track on your website.
In this chapter, we'll discuss standard events, custom conversions, custom events, and offline events. I'll explain how you can set up each one of them and provide you with some tips regarding the events you should be tracking.
You can either set up Meta pixel events manually using the relevant event codes or via Facebook's Event Setup Tool.
Note that you can also turn on Automatic Events, which allows your Meta pixel to automatically track valuable events, such as purchases and registrations, without having to set them up.
Automatic Events will be de-duplicated from any other events you have manually set up.
In order to enable Automatic Events, just go to the "Settings" tab in the Facebook Events Manager and toggle on "Track Events Automatically Without Code."
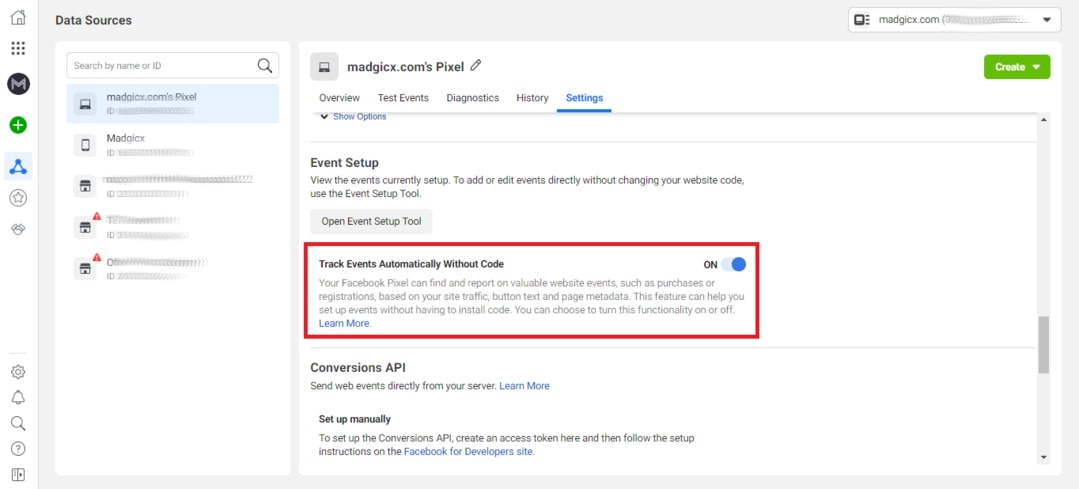
Pro Tip: If your business is in a regulated vertical, you won't be able to use the Event Setup Tool. If your business belongs to one of these verticals, you'll have to set up your events manually.
The regulated verticals are investment banking and brokerage, insurance, financial services, retail, credit union, and commercial banking, credit, financing, mortgages, pharmaceutical, and health.
How to set up events using the Event Setup Tool
- Go to the Facebook Events Manager.
- Under the "Overview" tab, click "Add Events". Alternatively, you can tap into the "Settings" tab, scroll down to "Event Setup," and click "Open Event Setup Tool."

- Select "From the Pixel and then click "Open Event Setup Tool".
- Enter your website's URL and click "Open Website". Make sure you write the full URL with HTTP(s) in the beginning.
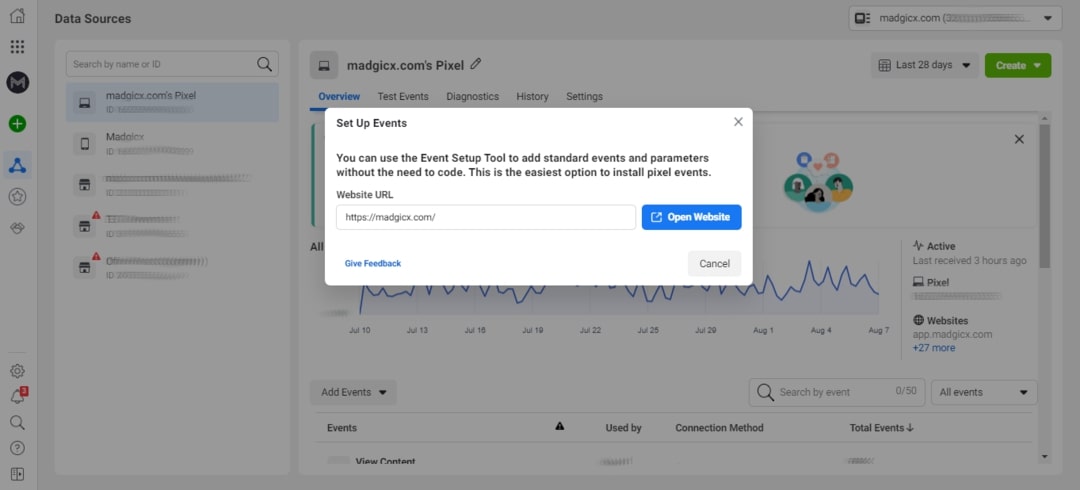
- The Event Setup Tool should open up on your website. If it doesn't, try turning off your ad blocker.
- You can now go through each page on your website and add a button click or URL tracking. You can also view the details of your existing events, edit, or delete them.
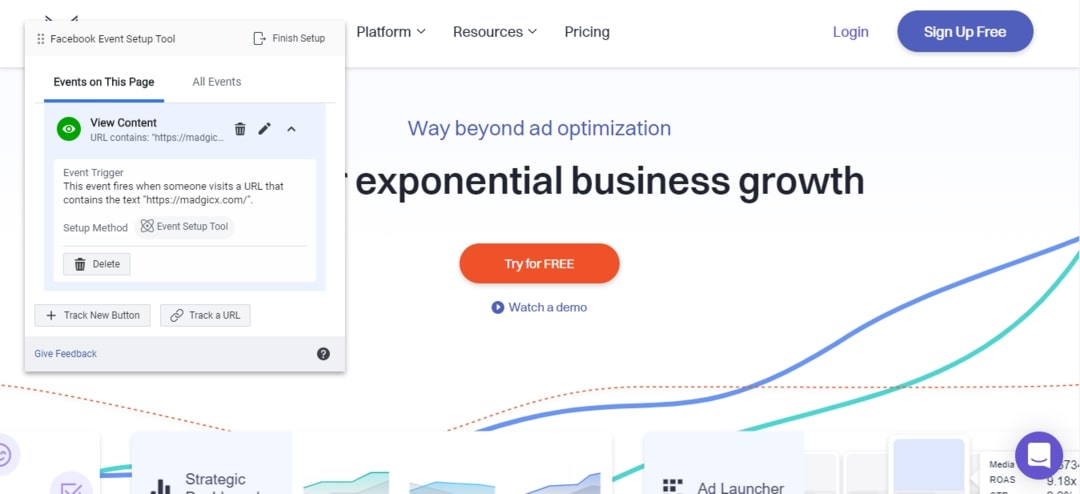
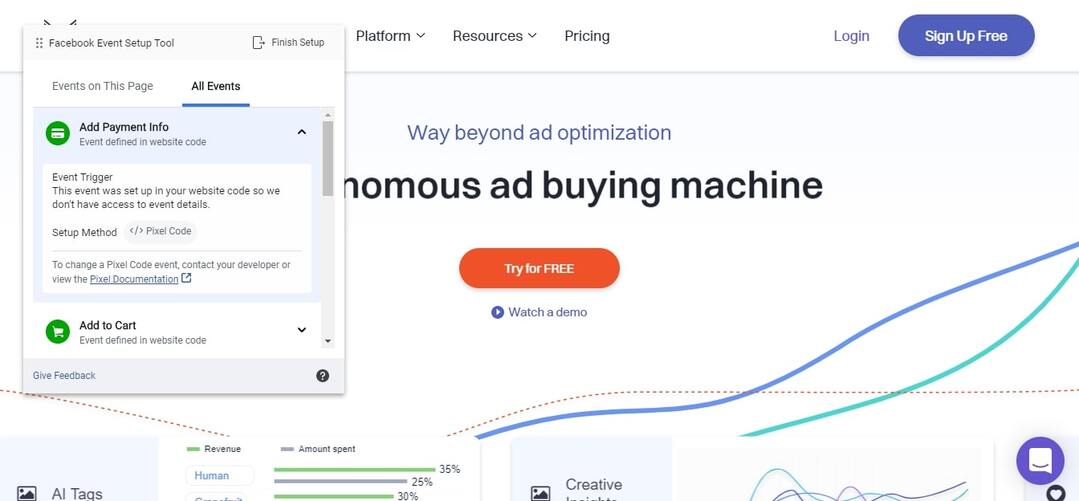
- You can also tap into the "All Events" tab to view, edit, or delete events you set up on other pages on your website.
- Note that if you set up an event manually in your website code, you won't be able to view its details, edit, or delete it using the Event Setup Tool.
- Once you're finished, you can either click "Finish Setup" or go back to the Events Manager and click "Disconnect".
Meta pixel standard events
Meta has already prepared a list of standard events that you can track:
- Add Payment Info: The addition of billing information, such as a credit card, during the checkout process.
- View Content: A visit to a web page that is important to you, such as a product or a landing page. This event only tells you that someone visited a specific URL, but not what they did or see on the page.
- Add to Cart: The addition of an item to a shopping cart or basket.
- Add to Wishlist: The addition of an item to a wishlist.
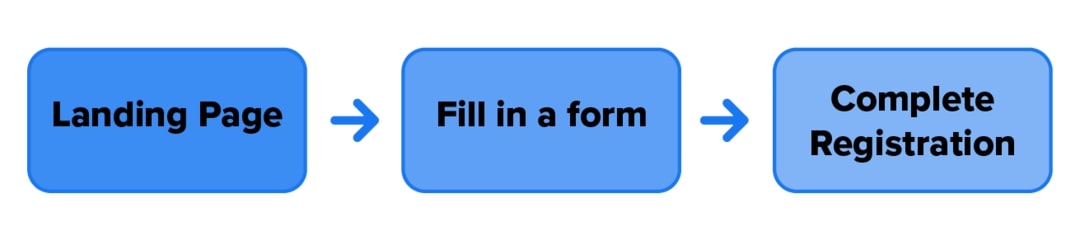
- Complete Registration: A submission of information by a customer in exchange for a service provided by your business, such as signing up for your email list.
- Contact: A phone call, SMS message, email, chat conversation, or any kind of contact between a customer and your business.
- Customize Product: The customization of a product via any kind of configuration tool or app your business has.
- Donate: A donation made to your organization or cause.
- Find Location: When a person finds one of your locations with an intention to visit. For example, searching for a product on your website and finding it in one of your stores.
- Initiate Checkout: The start of a checkout process.
- Lead: A submission of information by a customer with the understanding that they may be contacted by your business later on. For example, signing up for a trial.
- Purchase: The completion of a purchase, usually signified by receiving purchase or order confirmation, or a transaction receipt.
- Schedule: The booking of an appointment to visit one of your locations.
- Search: A search performed on your website, app, or other property.
- Start Trial: the start of a free trial of a product or service you offer.
- Submit Application: The submission of an application for a product, a service, or a program you offer, such as a credit card, an educational program, or a job.
- Subscribe: The start of a paid subscription for a product or service you offer.
But when would you like the pixel to register these events?
You have two possibilities: on page load and on an inline action.
When is it better to register an event on page load?
When the event is complete once the website visitor gets to a new page.
For example, when you have a "Thank You" or confirmation page after the visitor completed the sign-up process or a purchase.
When is it better to register an event on inline action?
When the action is complete once the visitor clicks a button, such as "Add to Cart."
You can also use this option if you don't have a dedicated confirmation page for subscription or purchase.
Which standard Meta pixel events should I track?
That depends on your business model.
Do you have an eCommerce business? Are you a SaaS company?
You should understand your marketing funnel first, and according to that, you need to make sure you install all the relevant pixel events across the funnel.
Each step of your funnel should trigger an event. This will help you optimize your ads later on.
eCommerce business events
Let's follow the most common process your customers go through on your website:
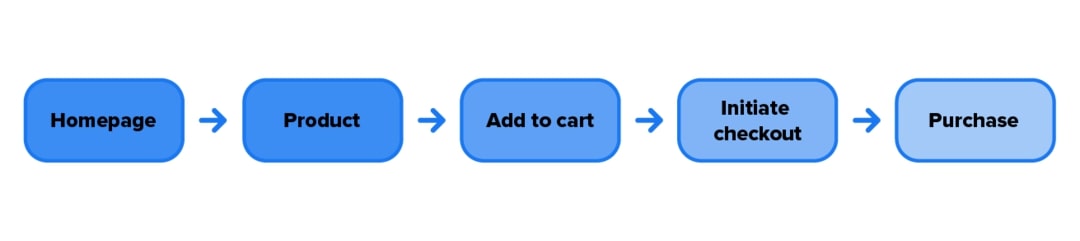
In that case, the essential events for you are:
- View Content: You'd like to set your pixel to register this event when a visitor views your homepage or a product page. You'd like to set this event to fire on page load. If you have category pages, you can set this event for them as well.
- Add to Cart: This event will be registered when a visitor clicks any "Add to Cart" button on your website and should fire on an inline action. If you use a wishlist on your website, you can also set up the event Add to Wishlist.
- Initiate Checkout: This event should also fire on inline action when a visitor initiates checkout.
- Add Payment Info: You can set up this event to fire on inline action when the customer clicks "Save" after adding their payment info, or when the next page in the purchase process loads.
- Purchase: This event will fire on inline action once a visitor clicks "Complete Purchase" or on page view if you have a "Thank you"/purchase confirmation page.
SaaS company events
If you have a SaaS or a B2B service company, your funnel looks a bit different:

The main events you would like to track are then:
- View Content: You'd like to register this event on page load on your Homepage, Product Pages, Blog Page, Blog Articles, and Sign-Up Page.
- Lead - in case you provide a free trial: You'd like this event to fire on page load if you have a "Thank you"/Complete Sign-Up Page, or on inline action when you don't and the customer just clicks a Complete Sign-Up Button. You can also use the Start Trial or Subscribe events instead.
- Add Payment Info - in case you only provide a paid subscription: This event will fire on inline action when the customer clicks "Save" after adding their payment info, or on page load if you have a separate page for adding payment info.
- Purchase - in case you only provide a paid subscription: This event will fire on inline action once a visitor clicks "Complete Sign-Up" or on page load if you have a "Thank you"/sign-up confirmation page.
Lead generation events
A lead generation funnel can look like this:
In this case, the main events you'd like to track are:
- View Content: You'd like to register this event on page load on each one of your Landing Pages and on your Sign-Up Page.
- Lead: You'd like this event to fire on page load if you have a "Thank You"/"Complete Sign-Up" Page, or on inline action when you don't and the customer just clicks a Complete Sign-Up Button.
App Install events
In that case, your funnel can look like this:

And the main events you'd like to track are:
- View Content: You'd like to register this event on page load on your Homepage.
- Purchase: You'd like this event to fire on inline action when the visitor clicks the Download Button.
Custom conversions
When should you create additional custom conversions beyond the standard events?
Do it when you want to tell Facebook what's the value of this specific conversion for you.
You can also use customization to distinguish between people who viewed different pages on your website, such as different product pages. Later on, you'll be able to show them exactly the ads they're interested in.
Custom conversions use URL rules based on specific URL or URL keywords, domains, or additional parameters.
How to create a custom conversion
- Go to Events Manager and select "Custom Conversions" on the left-side menu.

- Click "Create Custom Conversion".

- Give your custom conversion an indicative name. You can also add a description for further clarification.
- Choose your relevant pixel as the data source (in case you have more than one pixel).
- Select the type of conversion event you wish to optimize for. You can select each of the standard conversions you installed, All URL Traffic, or a custom event if you created any (more on that later).
- Add the rules. These rules can be URL- or domain-based, or event parameters. Read the list of all the available parameters.
- You can also enter a conversion value to tell Facebook how much this conversion is worth for you. This is helpful for monitoring your ROAS. If you don't enter any value, it'll default to zero.
- Click "Create".

Note that every ad account is limited to 100 custom conversions. That limitation is not per pixel but per account. However, you can delete custom conversions you aren't using anymore and create new ones instead.
Also, note that you can't use custom conversions with dynamic product ads.
Custom events
The next level of customization is called "custom events". These events are needed when you have important steps of the funnel that are not included in the standard ones. Every step of your funnel should trigger a pixel event. For example, if you have a questionnaire, your pixel should fire an event for each step of the form.
In order to create such events, you have to add the relevant Javascript code to the relevant page on your website. While custom conversions are tied to a URL, custom events can be called also when a visitor performs an action like clicking a button.
Pro Tip: Don't create custom events that are meant to replace standard pixel events.
If Facebook has already created a standard event, such as Purchase, for example, use it when the event is a purchase.
Facebook knows best how to find people who are likely to purchase and will optimize your ads for this type of conversion if you set it up correctly. However, if you create a custom event that is meant to replace it, Facebook won't be able to optimize for it properly, and you might miss out on potential customers.
Advanced Matching
Advanced Matching allows Facebook to collect hashed information about visitors to your website, such as email addresses and phone numbers.
The information is of course hashed before it is sent to Facebook in order to protect user privacy.
This way, Facebook can better match your website visitors with their respective Facebook accounts and increase the number of your attributed conversions. That will help you assess your ad performance much better.
This will also be very useful when you want to create larger website-based custom audiences for Retargeting.
Another benefit is decreasing your cost per conversion as the conversion-optimized campaigns you create will become more efficient.
You can either use manual or automatic Advanced Matching.
- Manual Advanced Matching: In this case, you or your web developer must modify the pixel base code to pass website visitor input as parameters in the pixel initialization. Use this method if your pixel is in an inframe, if you have an IMG pixel, or if your business is in a regulated vertical. Here is how you set up manual Advance Matching .
- Automatic Advanced Matching: This is a more simple method in case you don't know how to code yourself and have no developer to do it for you. It is very easy to set it up - just toggle it on in the Events Manager under "Settings." This will tell your pixel to look for recognizable form fields and other sources on your website that contain information such as first and last names or an email address. This data will be automatically hashed on your website, and after matching it with the respective accounts, Facebook will discard it.

If possible, it will be beneficial to use both manual and automatic Advanced Matching. You can read more about best practices for advanced matching for web to choose the method more suitable for you.
Facebook offline events
All of these events are great and very helpful when it comes to tracking actions people take on your website.
But what if, in addition to your eCommerce store, you also have a store "in the real world"?
How can you track the effect your online advertising has on sales in your "real-world" store?
Have no fear, Facebook offline events are here!
How to register Facebook offline events
The first thing you need to do is create an offline event set.
This is how you do it:
- Go to Events Manager and click "Connect Data Sources" on the left-side menu.
- Select "Offline" and click "Get Started".

- Give your offline event set an indicative name. You can also add a description to further explain it.
- Click "Create."

- Select the ad account(s) in which you want to use this offline event set.
- You can turn on auto-tracking so that every new ad you create will default to this event set.
- You can also turn on auto-assignment in order to automatically assign every new ad account to this event set.
![]()
- Click "Next" and that's it, your offline event set is ready.
Note that for some business types, Facebook automatically creates and assigns an offline event set. In this case, you'll find it in the Events Manager. Just select "Details" to manage it.
Now you can start uploading your Facebook offline event data.
There are three possible ways to do this: Via the Offline Conversions API, using a partner integration, or doing it manually in the Events Manager.
It is recommended to upload this data regularly to make sure it's up-to-date. That's why it may be easier to use the API or a partner integration and automate the process.
Tracking your offline conversions will allow you to get a full view of your ad performance and also let you create custom and lookalike audiences based on visitors to your "real-world" store.
Efficiently monitoring offline events is essential for implementing a successful omnichannel marketing strategy.
Meta pixel 2.0 - Offline Conversions API
Meta is putting a lot of effort into improving its pixel constantly ever since the day it was launched.
As I already mentioned, the new pixel was first introduced in 2015 and customer matching was improved in 2017.
Later on, Facebook also shared session data to improve match rate, and now, with cookies being limited and even disappearing, Facebook introduced a Server-to-Server (S2S) solution.
Meta doesn't want to rely on the browsers, as it wishes to become more independent. Therefore, it's now progressing in the direction of S2S data transmission using the Conversions API. This API is sometimes referred to as the "Facebook offline conversion integration."
This could be a real game-changer for Meta and for many advertisers.
At the moment, advertisers need to be granted permission to use this API. You need to request it and you should also talk to your Meta representative about it.
It relies on adding a Facebook parameter called "fbclid" at the end of URLs. This can be referred to as Facebook Click Identifier, in analogy to the Google click Identifier, which allows Google to exchange data between Google Analytics and Google AdSense.
This S2S postback tracking system is very useful for SaaS companies and Lead generation businesses that need to track conversions in a more sophisticated way.
How to check if your Meta pixel is working?
After creating a Meta pixel, installing it on your website, and setting up the events you want to track, you probably want to make sure your pixel is actually working, right?
You wouldn't want to wake up one day find out that your pixel wasn't accumulating data properly (or at all).
In this chapter, I'll introduce 3 essential tools that will help you ensure that something like that doesn't happen, and if it does, you can troubleshoot any issue that occurs.
There are three main tools that can help you make sure that your pixel is working properly: Google Chrome's Meta Pixel Helper extension, Facebook's Diagnostics Tool, and Facebook's Test Events Tool.
Facebook Pixel Helper Chrome extension
This extension has many names, and some people may call it the "Facebook Pixel Checker" or "Facebook Pixel Finder," for example.
The Meta pixel extension is now available also for Microsoft Edge and not only for Google Chrome.
The Facebook Pixel Helper will show you whether your pixel is active and help you troubleshoot different issues. If your Meta pixel is not active, you'll know right away using this extension.
How to install the Facebook Pixel Helper Chrome extension
- Use this link to add the Facebook Pixel Helper Chrome extension to your browser.
![]()
- Go to your website.
- If your pixel is working, the Facebook pixel extension icon will turn blue and show the number of active Meta pixels on the website.
- Check also that the pixel installed on your website has the same ID as the one you see in the Events manager.
- Clicking on the Facebook pixel extension icon will open a pop-up window, that will tell you whether your pixel is working properly. If not, an error notification will appear.
![]()
- If you discover any issues, you can troubleshoot them on the Events Manager.
Troubleshooting Pixel issues with the Facebook Pixel Helper
- "We detected event code but the pixel has not activated for this event, so no information was sent to Facebook. this could be due to an error in the code, but could also occur if the pixel fires on a dynamic event such as a button click."
The warning shown in the image above is actually pretty easy to troubleshoot.
This is usually an ad-blocker issue. Once you disable the ad blocker (even just for the specific website), you'll see that the warning is gone.
![]()
- Pixel Did Not Load
This error occurs when the Facebook Pixel Helper finds what seems to be a pixel code on your website, but the actual HTTP call was never made.
This could mean you have an error in the code, or that the Pixel fires on a dynamic event, such as a button click.
Clicking the button can solve this issue.
- Encoded Characters
This means that the Facebook Pixel Helper found double-encoded characters.
This could happen when you have a tag or a CMS system that encodes already-encoded information. For example, encoding "&" into "&".
- Not a Standard Event
The Facebook Pixel Helper has identified an event that is not one of Facebook's Standard Events.
If you didn't code such a custom event on purpose, fix your code. For example, you might have mistakenly named your event "Purchased" instead of "Purchase".
- Pixel Activated Multiple Times
A pixel registry with the same ID and event name was sent multiple times to Facebook.
This is typically an error, as a single event should only be sent once to Facebook. Even if it contains different custom parameters, they should all be aggregated and sent at the same time.
- Invalid Pixel ID
The Meta pixel ID sent to Facebook didn't match any ID that exists in the system.
In this case, you should go to the Events Manager and check your Meta pixel ID.
- Can not find Product Catalog
The Product Catalog ID which was sent in the field "product_catalog_id" in the pixel registry could not be found on Facebook's system.
You can find your Product Catalog ID in the Business Manager under the "Settings" tab when clicking "Product Catalogs".
If your pixel is not paired with a product catalog, here's the solution, together with other troubleshooting suggestions.
Facebook's Diagnostics Tool
In order to use this tool go to your Events Manager and enter the "Diagnostics" tab.
![]()
Facebook's Diagnostics informs you of pixel-related issues and suggests appropriate solutions.
If this is not a real issue for you, you can click "Ignore". You'll always be able to "Unignore" it in the future.
In order to solve an issue click "See Affected URLs" to locate the problematic pages and parameters and make the necessary corrections.
If you wish your website manager to solve the issue for you, you can click "Send to Developer".
There are a few issues Facebook might inform you of:
- Invalid Currency Code

This error appears if the currency code for an event isn't formatted correctly. The currency code must match the standard 3-letter ISO currency codes, like USD or GBP.
Learn more about setting the currency for your event.
- Missing Event Name
One of your events is missing a name. Every event code must contain an event name, whether it's a standard event name or a custom event name.
Read more about formatting events.
- Invalid Value Parameter, Missing Value Parameter, or Missing Currency Parameter

A value or a currency parameter is empty or missing, or a currency parameter isn't formatted correctly.
Every event code snippet needs to contain both value and currency parameters. The default standard event code contains $0.00 USD, which you change to the value and currency you want.
The value field must contain a decimal number greater than or equal to zero, and may not include letters, special characters, currency symbols, or commas.
Read more about setting the value and currency for your event.

- Event Name Mismatch
This means that one or more of your standard events is similar but not identical to one of Facebook's standard events.
If you'd like to measure this action as a standard event, you need to update the event code snippet on your website to match the standard event formatting.
Important note: Events are case-sensitive. For example, a Purchase event must be written as "Purchase", not "purchase" if you'd like to measure and optimize for this event as a standard event.
- Multiple Events On an Action
Your pixel is sending multiple events in response to a single website visitor action, like a button click or a page load.
To improve your data collection and optimize your ad account, you should only add the specific event code to specific pages or inline actions that reflect the specific action someone takes on your website.
For example, a Complete Registration event should only be added to a page that indicates someone has completed a registration process, such as a "Thank You" page.
After locating the problematic pages, remove the redundant event code snippets from pages where that action doesn't occur.
Check your website's HTML code and remove any extra event code from your HTML template header.
The only Facebook code that belongs in your website's header is your Meta pixel's base code (which contains the Page View event).
- Redundant Purchase Events

This error occurs if your pixel receives 4 or more purchase events when someone makes a single purchase on your website.
This over-reporting may negatively impact the delivery of ads using Conversion or Product Catalog Sales objectives later on.
To improve your data collection and optimize your ad account, you should only add the Purchase event code to a specific page on your website that indicates someone has completed a purchase, like a "Thank You" or a confirmation page.
You can also add the purchase event code to a specific inline action, such as a button click, in case you don't have such a page.
After locating the problematic pages, remove unnecessary Purchase event code snippets from any page of your website that doesn't indicate someone has made a purchase.
Also, check your website's HTML template header to make sure that it doesn't contain any purchase event code.
- Invalid Email Provided
This happens when your pixel sends Facebook an invalid customer email address. This error might damage the performance of advanced matching features.
In order to solve this issue open your website's source code and make sure the Pixel advanced matching features are set up properly. Learn more about advanced matching on Facebook for Developers.
- Duplicate Events Detected
This error appears if you have an event that's being logged using your website's source code, and also as an automatic event.
Duplicate events being received by Facebook might harm the accuracy of your pixel reporting.
In order to solve this issue, read how to turn off automatic events. You'll continue to receive this event if it's set up on your website's source code.
- Event Contains Sensitive Data
This error appears if one or more of your Purchase events has been identified as being in violation of Facebook's Business Tools Terms.
Check your purchase events to make sure you're only receiving information that complies with Facebook's Terms.
Facebook's Test Events Tool
If you want to make sure your pixel is registering events correctly, you can use Facebook's Test Events tool.
You can find this tool in the Events Manager when entering the "Test Events" tab.

You can use this tool to Test Browser Events. This allows you to test Meta pixel events that you set up using your pixel code, a partner integration, or the Events Setup tool.
You can also use it to Test Server Events. This means you can test Meta pixel events that were set up via the Conversions API. More on this API later.
If you have installed an App as well, you'll be able to Test App Events using this tool too.
In order to test Meta pixel web browser events, open your website in a separate tab or window (since the activity is only recorded as long as the Test Events page is open). You can enter your website URL and click "Open Website."

Interact with your website and the events should appear in the Test Events tool within 30 seconds.

This data will be saved in the Test Events tab for 24 hours or until you clear it.
You can filter your events by activities (Standard Events, Custom Events, Custom Conversions, and Automatically Logged Events), by activity details (URL, Parameters, and Active Issues), and by source (Browser, Server, or App).

Click on an event to view all the details related to it.

When you're done testing your Pixel events, click "Clear Activity" on the right side of the screen.

This activity will still appear in your Events manager, Ads Reporting, and Audience creation Results, of course.
Note that after setting up your event for the first time, it might take up to 30 minutes before you can see it in your analytics, but you can still use the Test Events Tool to make sure it triggers properly.
If your events don't appear in the Test Events Tool, try troubleshooting your issues using Facebook's Diagnostics and/or the Pixel Helper.
Pro Tip: A good sanity check to make sure you set up your events properly would be based on your funnel.
For example, your Meta pixel should register a bigger number of Add to Cart than Purchase events, or more Add Payment Info than Purchase events.
If you work with a CRM system that registers Sign-Ups and Purchases, you can compare the data registered by it with your pixel event records.
If your pixel registered 80-90% of the events your CRM system has, it's set up properly. If it's about 60-70%, you need to check the way you set up your events and fix it.
What can cause you to lose the ad attribution to a pixel event?
If you lose ad attribution for events, the ad performance Facebook records isn't accurate, and you won't be able to optimize your account properly.
If you don't know your real ROAS and all your other important metrics, you won't know which ads should be scaled and how to allocate your budget.
There are a few possible causes for an attribution loss:
- Redirections on your website
For example, if your checkout process is made on a different domain, on which your pixel wasn't properly installed, your website visitor will lose the cookie and the Meta pixel won't be able to attribute the event to the relevant ad.
In order to avoid this, make sure you implement the Pixel properly on every page along your entire website funnel.
- Implementing the pixel code in a page's body instead of the header
Since the header loads first, that's where the Pixel should be.
If your website visitor left the page before the body finished loading, the pixel on this page would not load, and you will lose the cookie.
If you don't want to encounter such an issue, make sure you always implement the pixel in the header of the page or install it using an integration.
- There is one situation that has no solution, but that's a very rare case.
Imagine the following situation: Two friends, Rick and Morty, are viewing some content on Facebook using Morty's account.
Suddenly, your ad pops up. Both of them notice it, of course, but only Rick goes to your website and purchases your product later on.
Since Facebook doesn't have any documentation that Rick has viewed your ad beforehand, you'll lose the ad attribution, even though Rick did see your ad. Tough luck.
How to check if another website has a Meta pixel
You can also use the Facebook Pixel Helper in order to check if other websites, such as those of your competitors, for example, have Meta pixels installed on them.
For that reason, this extension is also known as the "Facebook Pixel Finder."
This way you can learn how your competitors set up their ads by checking which events they track on which page.
If you have an ad agency, you can also use it to know who's running Facebook ads and can be a potential customer.
This is the easiest way to discover who's running Facebook ads, as almost all the people who advertise on Facebook have a pixel installed on their website. Anyone running ads without a pixel is, well...
How to use Meta pixel for targeting
You've created a pixel and installed it successfully on your website.
You're tracking all the relevant events for every stage of your funnel.
Now it's time to get down to business - audience targeting. In this chapter, you'll discover how to leverage your pixel data to create powerful Facebook audiences and dynamic ads and optimize for conversions.
There are two types of audiences your Meta pixel can help you create: Custom and Lookalike audiences.
It is crucial to make sure your Meta pixel URL parameters are set correctly to be able to create these audiences later on. This is done when creating your Facebook ads.
Facebook Pixel custom audiences
On the Facebook Business Manager, you can create custom audiences based on the data gathered by your Meta pixel.
These audiences will be based on rules, which can be simple, but also very complicated. They are mostly used for pixel-based retargeting of people that have already visited your website.
How to create a custom audience
- Go to the Business Manager and click "Audiences" on the menu to the left. You can also access the "Audiences" tool from the Ads Manager.

- Click "Create Audience" and select "Custom Audience".

- Select "Website" as the source.

- Select if you want to target people who meet any or all of the criteria you will define.
- Select the event that will be the basis for your audience. The audience will include people who performed this action on your website.
- Even if you didn't define any events, you can still target all your website visitors or people who visited specific pages. You can also target visitors by time spent.
- Select the time frame in which these people should have taken this action on your website. The maximum number of days allowed is 180.
- Add more conditions for exclusion or inclusion.
- Give your audience an indicative name.

- Click "Create Audience".
Examples of useful custom audiences you can create
- People who visited a specific product page. You can retarget them with ads promoting this product or similar ones.
- People who already made a purchase. You can either retarget them with a coupon for their next purchase or exclude them from Retargeting campaigns promoting the product they purchased.
- People who added to the cart but didn't complete the purchase. You can Retarget them using dynamic product ads reminding them of the product they left in their abandoned cart.
- Big spenders. You can specifically target these people in order to increase your revenue.
Facebook lookalike audiences
After creating all the custom audiences you need to test, you can now use them as a basis for creating lookalike audiences.
A lookalike audience provides you with an opportunity to reach prospective customers, who share similar characteristics with your existing ones or with people who showed interest in your brand, such as your website visitors.
After defining your source audience, Facebook identifies the common qualities of the users included in it, like demographic information, interests, groups, friends lists, and other historical data, and creates a lookalike audience: a collection of users sharing those common characteristics.
Lookalike audiences are a super powerful weapon for acquiring prospecting customers. You can learn more about these audiences in this article.
How to create a lookalike audience
- Go to the "Audiences" tool in the Business Manager.
- Click "Create Audience" and select "Lookalike Audience".

- Select your website-based custom audience as the source.
- Select the location you wish to target.
- Select your desired audience size by a percentage of the targeted location's population.
- Click "Create Audience".

Dynamic ads
If you have an eCommerce business, running dynamic ads can be very beneficial.
These ads automatically show products from your catalog based on your target audience.

In order to create them, when choosing a marketing objective for your campaign, select "Catalog Sales" under "Conversion".
This tool is extremely useful when you have a large selection of products in your eCommerce store. In this case, creating individual ads based on pages visited will be too complicated and might not get you the results you want.
If you want to learn more about dynamic ads and how to create them, check out Facebook's page about this topic.
Conversion optimization
Now that you have your Meta pixel up and running, you can leverage Facebook's full potential when optimizing your ad campaigns.
Without tracking events with your pixel, you can't optimize your campaigns for conversions, which makes it harder to get sales, for example.
But with the pixel on your side, Facebook knows which conversions are meaningful for you, and will deliver your ads to the people who are most likely to convert.
For instance, if you want to optimize for Purchase, Facebook will target people who are more likely to purchase your product. Facebook has data that allows it to estimate who these people are, so you better use it to your benefit.
Pixel Q&A
In this bonus chapter, I'll answer some important questions regarding the Meta pixel.
Should I be using the same pixel for different localized domains in multiple countries, or use a separate pixel for each country?
As long as it's the same business, you should use the same pixel, even if you use different localized domains.
It's no problem to install the same pixel on multiple websites.
The reason is that as long as your business model is the same, a customer in Europe is no different than a customer in Asia.
Facebook handles geo-targeting very well and the most important thing for you should be accumulating as much data as possible.
Trust Facebook's algorithm and provide it with all the data within a single Pixel.
Can I install the same pixel on multiple websites within the same niche?
Absolutely.
First, technically, it's not a problem at all.
Second, this will get you the most data.
As long as all of your websites operate within the same niche, your customers will have a similar profile. So, when all of your different websites work together, your advertising can only benefit from that.
Moreover, if you will have different pixels and work separately with each website, you will be competing against yourself. Hence, you better avoid this kind of "cannibalism".
How to share my Meta pixel with other Business Manager accounts?
If you have an agency or an ad buyer running your Facebook ads for you, you'll need to share your Meta pixel with them.
How to do it?
- Go to your Events Manager, select "Data Sources" and choose your pixel.
- Go to the "Settings" tab and scroll down to "Sharing".
- Click "Share with A Business" and then add your partner's business account.
Note that you need admin permissions in order to share your pixel with another Business Manager.
![]()
On the same screen, you can also share your pixel with another Ad Account, in case you have more than one.
Note that when sharing your pixel with a partner, Facebook requires you to declare the type of business relationship you have with this partner, reaffirm the acceptance of the Business Tool Terms of Service, and, of course, get an agreement from your partner's business.
Once you've submitted a share request, you can check its status in your Business Manager under "Business Settings". Click "Data Sources", select "Pixels", and then "Partners".
If you want to grant other people in your business access to your Meta pixel, you can do it via your Business Manager.
Go to "Business Settings" and under "Data Sources" select "Pixels". Click "Add People" and then define the permissions you want them to have - View, Manage, or both.
![]()
How long does it take to have a "well-trained" pixel?
To be honest, you can't "train" your pixel. You can train yourself on using it :)
You want to optimize your event setup and your ad account in general, as most of the data Facebook gets comes from your account, and not from your pixel.
Optimizing your pixel event setup is a matter of the number of events it registers more than it's a matter of time.
There's no definite number of events the pixel needs to fire in order for you to know it's already "optimized". However, you need at least 100 people in your custom audience to create a lookalike audience from it. This means that you need at least 100 events for each event you defined in order to use this data for Acquisition campaigns and test its efficiency.
Should I install the Meta pixel on WordPress manually or use a plugin?
It depends on the way you plan to use your pixel.
If you just want to use Meta's Standard Pixel Events, implementing the code manually on your website will be the easiest and fastest way for you.
Another advantage of manual installation is that it allows you to create custom events much more easily.
However, if you want to create custom audiences and conversion goals directly from the WordPress interface, you better use a plugin.
I even wrote an article recommending the top Meta pixel WordPress plugins - you should check it out.
How to spot if my pixel was not active?
![]()
Facebook will notify you if there was a significant drop in your pixel event traffic. However, these notifications are limited to events used in your campaigns or audiences in the past week.
These kinds of drops might occur if there's an issue with your pixel base code or it has been deleted. This would, of course, make your Meta pixel not active. Check your website code or ask your website manager to do so.
Another reason might be that your pixel event code has been modified. Use the Test Events Tool to make sure your events fire properly. You can also use Facebook's Diagnostics Tool to fix any issues with your pixel.
If you recently created or edited a pixel domain allow list or block list, this may also cause a drop in pixel event traffic. Review your list under "Traffic Permissions" in the "Settings" tab in your Events Manager. You can also review changes made to your list in the Pixel history table under the "History" tab in the Events Manager.
It might also be caused by a real drop in website traffic. Compare your pixel reporting with other website analytics tools. If the data shown there is similar, check whether your ads stopped delivering, as this might cause a drop in your website traffic.
One more possible reason for a traffic drop is that one of your website links is broken. Use Facebook's Diagnostics Tool to make sure all your links are intact.
Your website might also be down. To check this, compare Facebook's Events Manager reporting with that of another analytics tool. If your website is truly down, contact your developer.
How to change my pixel's name?
It's not fun to have your pixel called 124962837.
It's better to give it an indicative name so that you can recognize it. Here's how you do it:
- Go to the Events Manager.
- Select your pixel on the menu to the left.
- Click the pencil icon next to your pixel's name on the top of the screen.
![]()
- Change your Pixel's name and click save.
When should I create traffic-allow/blocklists for my pixel?
Traffic-allow lists let you choose which domains can send events through your Meta pixel and exclude all the domains that are not on the list.
Blocklists work the other way around: they enable you to choose which domains you won't receive pixel events from, while all the others can send events through your pixel.
Creating an allow list gives you better control over your pixel event traffic. Use this method if you only want to receive pixel events from a small number of domains, such as your website, your app, and some partner domains.
A blocklist may be the better solution in case you wish to receive events from a large number of domains. In that case, you'll just need to add domains to the block list in case someone uses your pixel without your permission, or if one of the domains you used has become irrelevant.
In order to create an allow/block list, go to the "Settings" tab in the Events Manager and scroll down to "Traffic Permissions".
You can only have one of the two - either an allow list or a block list.
Learn more about the best practices for Meta pixel traffic permissions.
Key Takeaways
Now you know why the Meta pixel is much more than just a pixel.
If you advertise on Facebook or plan to do so in the future, the Meta pixel is one of the most important tools you need to use. Period.
And now I hope you understand why.
There is a lot to learn about the Meta pixel and it has many capabilities that can make it more efficient for you and your business.
I hope this guide covered most of the things you need to know. Thanks for reading, and good luck!
Source: https://madgicx.com/blog/facebook-pixel
0 Response to "What if I Dont See the Header in My Facebook Feed Telling Me if I Was Affected by the Breach"
Post a Comment